
ASK THE DRYWALL PRO
Subject: 5/8" sheetrock on ceilings, 9 foot walls
Mike I just found your WEB site. It is great wish I had found it sooner. After my father died, my mother rented out his retirement home. After a fire, I have completely gutted the house. I have put up about half the ceilings with ½ sheetrock before I found your site. Now I read I should have used 5/8 sheetrock on the 24 inch ceiling joist to keep it from becoming wavy. Before the fire some rooms were wavy, we just thought it was hung wrong. Is there anything I can do to prevent it from getting wavy over time or is it a case of either tear it down or can I put a second layer of 5/8 over it now, or just live with the fact it will become wavy (hot, high humid area)? Also does it matter if the walls are hung vertically or horizontal. It has 9 foot ceilings so 4 foot wide is going to require a long rip cut. This will be my retirement house in a few years so I want to do it right. Thanks for any advice. Ken
You can tear down the 1/2" or go right over it with a new layer of 5/8's. They do sell a 1/2" ceiling board that will not sag. As far as the walls you can either stand up 9 footers (vertically) or they make 54" board (also known as Fat board) you would hang horizontally. Either way works fine, the beauty of standing them up (Especially for a rookie) is no butt joints.....Mike
Subject: Estimating proper amount of sheetrock
Hi Mike,
My name is Sheryl. I found your website and have found it helpful. I have a question if you will. I'm completely redoing an old house. It needs to be sheetrocked through-out. My question is; How do I estimate how many sheets will I need to cover walls and ceilings? Is there a trick to averaging this number, or is there a formula that I should know? Also, what thickness should I buy?
Yours Truely, Sheryl
You need to decide if you are going to be using 8 footers or 12 footers. If the ceiling studs are 24 inched apart you need to use 5/8's rock on the ceiling. If the studs are 16" apart you can use 1/2" sheetrock. Walls are always 1/2" sheetrock.
Its pretty easy to figure. Say you have a ceiling that is 20' x 13'
You would go 20x13=260 That's your square footage. There are 48 square feet in a 12 foot sheet of rock (4x12)
32 square feet in a 8 foot sheet (4x8).
So take your 260 divided by 32 = 8.125
So you need 9 4x8 sheets to do that ceiling.
260 divided by 48 = 5.4666666, you need 6 12 footers to hang that ceiling.
I usually walk through, measure all the ceilings 1st, come up with square footage, then figure how many sheets and add a few extra for a cushion.
You can use the same formula for the walls. Say the wall is 12 feet long, your ceilings are 8 foot high, so you know 2 12 foot sheets will do that wall.
Anybody that does this for a living (Like myself) can just walk through without a tape measure and just count sheets in their head for the walls. You want the fewest amount of butt joints as possible so if you are going to use 8 footers, stand them up straight so you only have recessed joints. Make sure when you do have butt joints on the walls or ceilings you stager them, no common joints, that is bad.
Good Luck....Mike


Subject: Sparkled Cut Glass
Hi, We want to redo a bedroom ceiling in our daughters room. She wants the ceiling to be sparkled, cut glass I think? Do you do this and what is used? Is it safe and how is it applied? Thanks Kim Petroske
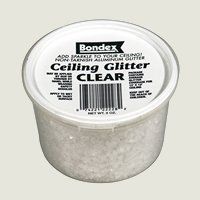
It's called "Glitter"
You can buy at any paint store, drywall supply store. They sell a few different types of glitter applicators (guns). The cheapest is a little bottle with a straw deal sticking out of it, you squeeze the bottle shoot the glitter onto any wet surface. It could be wet mud from a drywall textured ceiling or it could be wet from a recently painted ceiling. Some glitter will stick, some will fall on the floor but it's what you would use and it is safe...Mike

Subject: Old uneven plasterboard
Hello Mike, I have a question for you. I was hoping you could maybe consider doing a "ask the pro" answer to this question. First off, your site is fantastic. I haven't come across a "how to" site that is as well explained and detailed as yours, very good work. ok, now to my question... I am in the process of remodeling the kitchen in my house which was built in the 50'S. The finish on the walls consists of plasterboard which after cutting into, I have discovered that the thickness can vary up to a 1/4 in thickness in some areas, and can reach a total thickness of up to 7/8". now, I removed the soffit in the kitchen and have patched the areas with 5/8" drywall, and have noticed there are many areas where there is a considerable step in height(up to 1/4") between the old and new drywall/plasterboard. would you still use the method you describe on your site for normal, new construction butt joints. or would I have to change the technique for this situation. should I use mesh tape and durabond for this butt joint, or should I use paper tape and regular joint compound(plus 3). also, there are areas where my demo work was not as graceful as I would like, and there are areas where the gap between the old and new board that is up to 1/4" to 3/8 wide. would you recommend using durabond and mesh tape for these areas, or will normal joint compound be ok? I hope have explained this situation well enough and have not caused any confusion. if you would like pictures, I would be more than happy to supply them. by the way, I am going to try to take before and after pics and send them to ya. seeing as though I dont think I would have been able to tackle this projects without the help of your site. thanks, mike. Mark, Hinckley, Ohio
If you want to send some pictures, I will post them. Okay,This is how I would do something like that. In my van I carry a bundle of wood lathe strips and a bundle of cardboard shims. (Menards)
Say you're going to be using 1/2" sheetrock. I would go around the whole patch area and try to build the studs up using the lathe, shims and or strips of sheetrock so that when I install the patch piece, everything lines up close to flush. It's hard to make it all look right when you're depending on just mud.
Now, with all that being said, your deal is already hung so the mud is the only way.
I would mesh tape it. Mix up a pan full of 20 minute mud and try to keep it thick. If it's thick enough you can force it into ther gaps and it will stay. If it's thin, you will get these drooping bubble deals. So, thick 20, consider this more of a pre-fill then a 1st coat. If you want a little more time, use 45 or 90 minute mud.
Using a 6" and a 12" knife, work your way around filling in the gaps, skim over the areas that are mismatched.
After that sets up switch to a regular mud for the next 2 to 3 coats. When you think you have it beautiful, putty coat the whole deal and it will be perfect. Thanks for the e-mail..Mike
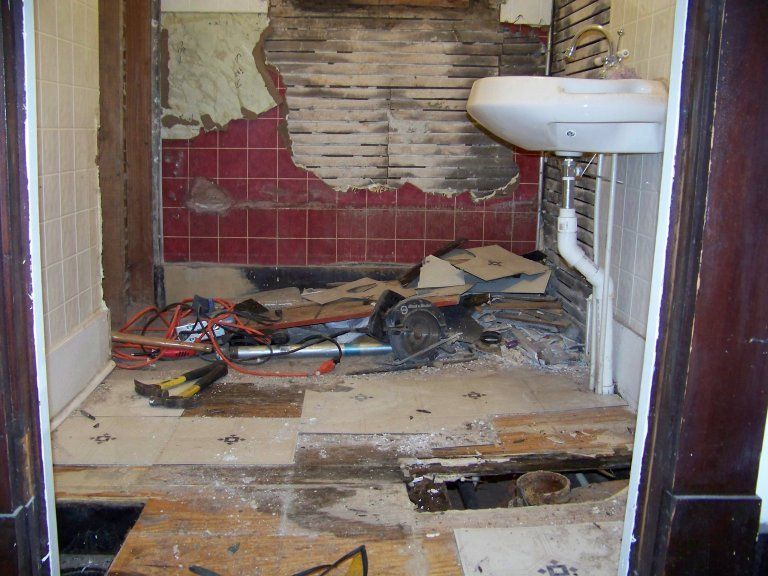
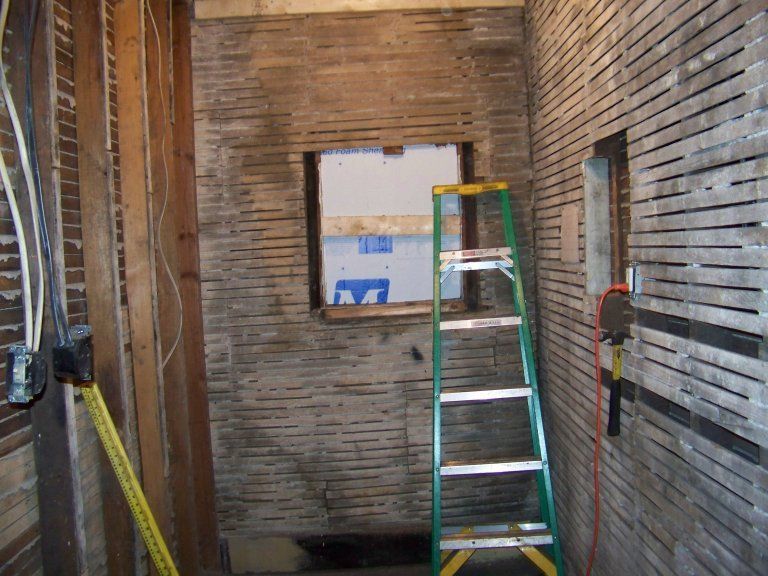
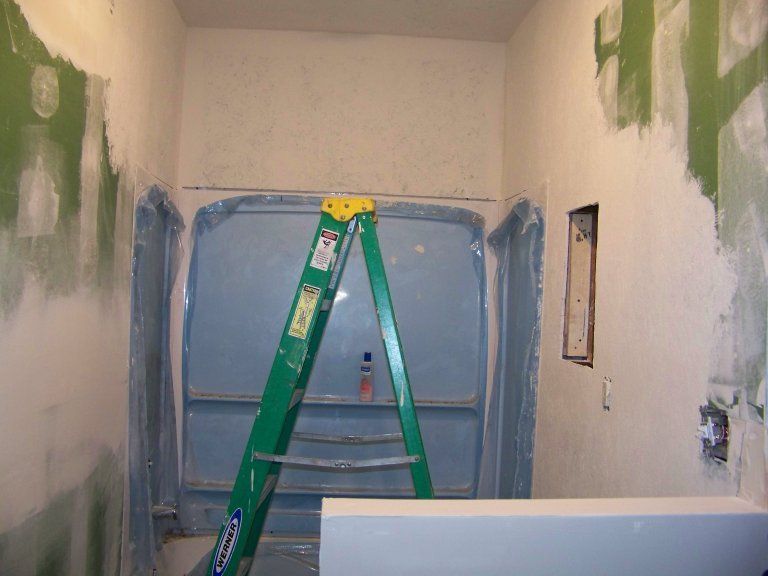
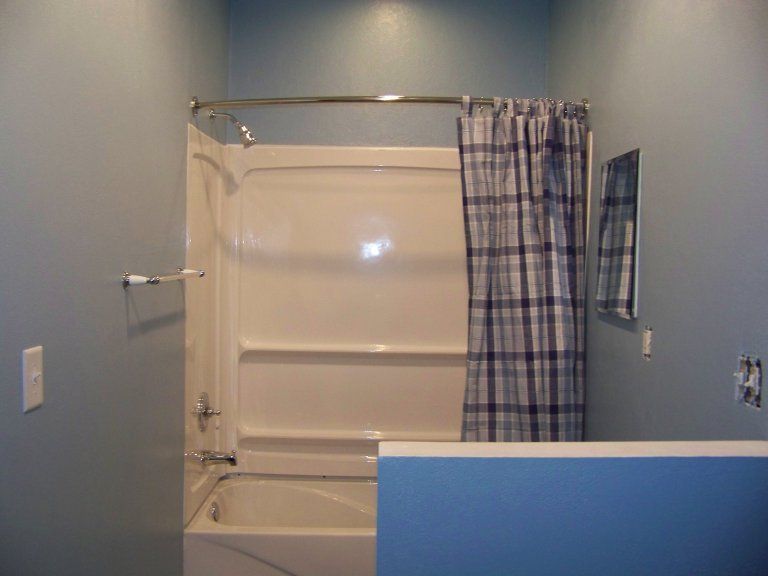
Subject: Burke Bathroom
Hi, My name is Jason and I have been taking on the major task of remodeling my bathroom. I have some construction experience, mostly as a residential electrician. My house was built in the early 1930'S and has plaster walls. I was very teary about drywalling my bathroom and even more so about mudding. It didn't turn out perfect, but for a first timer I think it turned out O.K. Your website gave me some very important tips that made this job turn out the way it did. I really appreciate all of the time and effort you have put in to helping others, myself included, for nothing in return.
I have included some pics of my project and the finished result. Not to sound corney but I really couldn't have done it without the help you have provided.
Thanks alot, Jason.
I'm proud to post your pictures. Your bath turned out beautiful, I'm glad I could help...Mike

Subject: Drywall Screwgun
Hi Mike, this is a great web site I only wish I had found it sooner.My question is about drywall screw guns, Are they hard to get the hang of using or is it just me. After seeing the pros using them on tv , I purchased one to replace my cordless drill . They looked so much faster and the fact that they counter sunk the screw was very appealing. But now I spend more time reversing out bad screws or lose the screw when I push it into the drywall that there must be something wrong. Any hints on the proper use would be appreciated. thanks Jeff
Don't waste your money on a cheap screwgun. It will give you nothing but grief. A couple good brands to look for are "Grabber" and "Makita". Spend at least $100, When you are screwing, try to avoid grinding the screw in. This is the sound it will make"zooooucchmypoorarm". You'll strip the screw, wreck the screw gun and kill your arm.
You want to give it a quick little jab like "zoont" (sorry that my best sound effects). Also don't hold the gun like it's a real gun (with your finger on the trigger). Hit the button that makes the gun run constantly then hold the gun with your hand on the top like in this picture -->
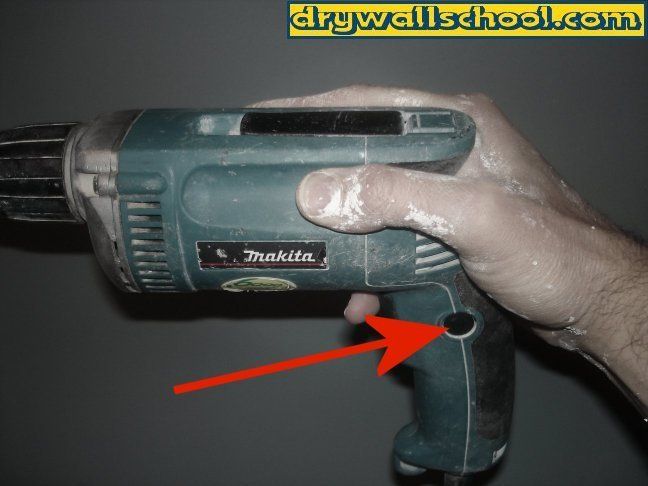
While you're jabbing the screw in with one hand the other hand is in the pouch getting another screw ready to load up the gun. Good Luck
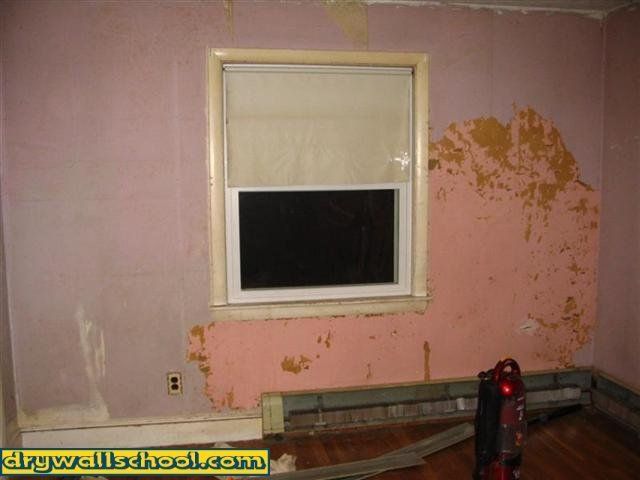
Subject: I Didn't Do A Half Bad Job With The Puttycoat
Mike, Hi there. First of all, I feel I owe you a case of beer but since I can't get that to you easily I would like to say thank you so much for providing such invaluable information on your web site!
My story: Last March I took on the task of repainting one of the bedrooms in my house that was really beat up. I'll let the before and after pictures speak for themselves. I used your puttycoat technique along with a layer of sealer, then primer, then Sherwin Williams paint. I'm more than happy with the results. Thanks again and here are two before and after photos of the wall that was in the worst shape.
Thanks again, you rock! Michele in Massachusetts
Subject: Botched Slap brush Job
Mike, I have a contractor doing drywall finishing in my house. I've done a pretty fair amount of drywall hanging and finishing for myself and occasionally for others in my time. These guys assured me they knew what they were doing...so much for assurances! They applied a slap brush texture (Crows Feet) to the ceilings in a basement finishing project "trying to match" those in the 1st and 2nd floors of the house. Disaster... seams showing through, finish is extremely inconsistent, almost smooth in some places and very coarse in others. They have agreed it is pretty awful and promise to fix it. What "should" they do? Just trying to get a professional's input. I am guessing that they should sand it down relatively smooth, get the seams and mud lines decent and reapply. They tell me the problem was not enough mud in the mix when it was applied. Realize it's hard to advise without seeing it, but any input would be appreciated. Wish you were in PA so I could have used you instead of these YaHoos. Bob
If it isn't real bad, you might be able to just knock off the high spots with a knife, then re-texture, Tell them they should buy my "How to do a slapbrush Texture" It would be the best $10 they could spend. It will show how to do it right.
I don't get what they mean about not enough mud in the mix? It is nothing but mud so what are they mixing it with?
Hope I helped a little...Mike
Mike Thanks for your help, I bought your "how to do a slapbrush texture" for myself. I fired the contractor they just kept making things worse. Learned the technique from your photos and video clip. You're right, the best $10.00 I could have spent. I determined that they were mixing paint into the mud, which apparently is common at least in the PA area. One supplier (where I bought the Double crowsfoot brush) even stocks a paint formulated just for that application. I went with straight mud. Ceilings came out great.. Thanks again for the help. Bob
That is great, I'm glad it all worked out. Thanks for buying the tip and thanks for the e-mail...Mike
Subject: Muddin' Ceilings
Mike, I've been following your techniques for applying tape and mud coats in my large double stall garage. Very awesome !!! Way better then glob and sand like I've seen others do. My ? is what's the trick to ceilings? I'm having a hard time from not wearing and losing 1/3 of the mud when I lay down the initial bed before I taper and swipe. It's frustrating and I have to repeat my initial bed a few times because it runs out in spots and is taking forever to do.
I'm going to texture the whole thing. What's your opinion on the # of coats I really need? Everyone is telling me to do a quick couple of coats because the texture will cover up mistakes or imperfection but I'm afraid It'll shrink and show as I'm using the USG All purpose for all my coats to keep cost down not to mention the range of temps it'll be exposed to. Not quite freezing but close.
Should I stop with the green bucket of mud after the first post taping coat and go with blue? I'm afraid the two wont sand the same since I already have two/three coats of the green in some places. But there again everyone says the texture will cover it up !!! I just don't want it to look cobbled...
THANX, Jeff P. Nuebel
I made you a video today, hope it helps. Try wiping the corners of the knife off before you start coating. It's in the video, Good Luck....Mike
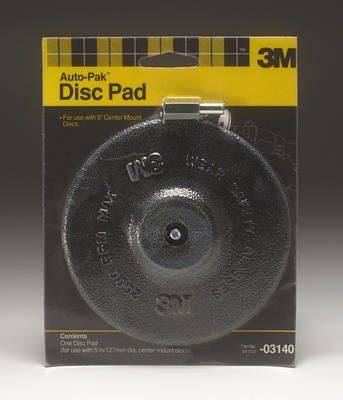
Subject: Round Angles (Coves)
I just found your website and it is fascinating!
I will have to replace my bathroom ceiling. It is currently a plaster ceiling and with the age of the house, the ceiling has two 45 degree curves, about 16 inches apart to align the ceiling to the wall.
Question: Is there a way I can bend sheetrock to accommodate the same style in the rest of the 2nd floor?
Thanks. Rich Wolowicz
They do sell special sheetrock made just for bending. You can also wet sheetrock to get it to bend,If you scroll down this page there is more detail about bending drywall.
What I think you're talking about is just kind of a rounded angle (A cove)?
You know the round rubber sanding disc things you buy for a drill? Most of them are now made of plastic and really stiff. If you can find a good flexible rubber one like this.
(Picture below on the left) This is the tool you need to coat these rounded coves.
They do sell a real professional cove tool with a hole for a pole, They suck!!,(Picture below on the right)
Any of the pro's I know use the rubber disc.
Hope this helps,Next time I use the cove tool, I will take the camera and show how to use it...Mike

Subject: Cutting Sheetrock Angle Pieces
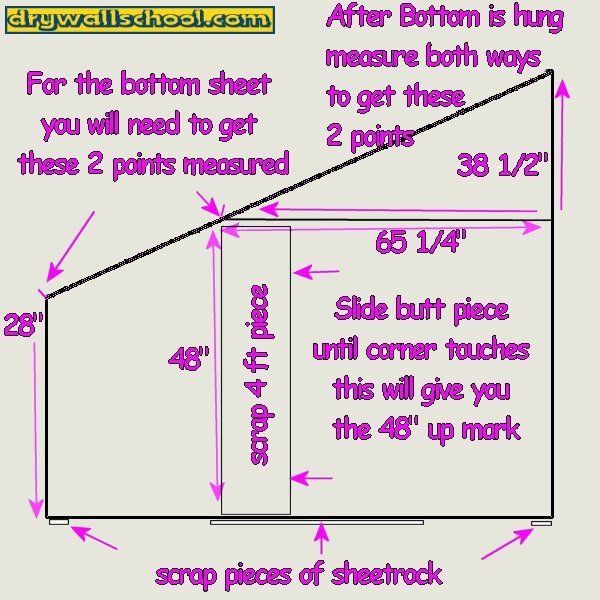
Hi Mike, I will be drywalling a storage area under some stairs, meaning the top of the walls will be sloped. What is the best way to measure and cut pieces so the slope is correct? Brad Armstrong
Okay, I kind of made a picture here to try and explain how I would do it.
Start out with a few pieces of scrap on the floor (each corner).
On the left side measure from the scrap piece up until you hit that angle.
Now you need the 4 foot up mark. Slide a small butt piece (A butt piece is an uncut 48" up and down) over until it touches that upper corner. Make sure there is something under the butt piece to get it up a 1/2" so this mark will be even with your 1/2" scrap pieces.
Mark that spot by measuring from the right to left (65 1/4").
Now that have the measurements it's time to cut your bottom sheet.
1st cut the over all length, then measure up the left side, mark it, them measure on the top of the sheet over 65 1/4", mark it.
Chalk line the 2 points, cut , hang it. Once you get a few nails or screws in the top of the sheet, remove the pieces of scrap from the floor before you really hang the sheet for good.
Once the bottom sheet is hung the top piece should be easy. Just measure up for one side and left for the other, mark, chalk line, cut it, hang it..
Sometimes the scrap piece you cut off the bottom sheet will work for your top piece (sometimes you don't get that lucky)
Subject: Ugly Joints
Mike, For the past 10 months my wife and I have built out our 2, 200 sq ft basement. We primed and painted our first coat. We used 8X12 sheets horizontally to minimize the seams. the vertical seams are well hidden. However, our wall horizontal seams which are 40" off the ground are not up to par, either too much mud creating a slight bump along the seam or not enough creating a slight depression in the wall. After the paint dried my first reaction was to tear it down again and start over but we are too far along to do that. What options do we have to remedy this now that the paint is on the walls? Tony
Okay Tony, Go through with a 12 inch knife and a pencil, Put the blade of the knife on the joint..The joints that are humped, mark with the pencil on the outside of the joint, the hollow ones, put a line on the inside (You can mark them any way you want).Then just go through and give every bad area another coat (It's okay to coat over a painted wall). Give each spot what it needs. Either build up each side of the humpty's or fill in the middle of hollow ones.
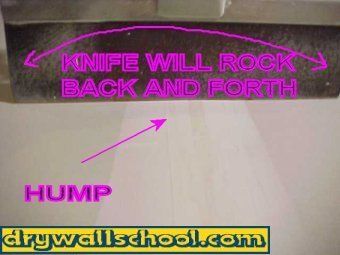
The only other way out would be to give the whole deal a texture (knockdown, orange peel, slapbrush/knockdown, whatever) This will hide a bunch of imperfections...Mike
How about a free video to really help you out ??
This one shows how to coat ceiling joints
Subject: Cracks
Hi Mike
I have a crack that keeps coming back no matter what I do?? Got any idea's?....Chuck
Go here www.drywallschool.com/crack.htm
Subject: Old Saggy Ceiling (The Ocean Wave Look)
Hi Mike:
We are in the process of remodeling our home (built in 1978) and have one large concern. Our ceilings have an "ocean-wave" look to them where the drywall looks like it is higher where connected to the studs, then dips down in the center of the drywall. Ceiling also has a smaller popcorn texture which I dislike. How can we best fix the situation on a limited budget - can we just put a new layer of drywall over it or do we need to tear it out. We live in a community of about 20,000 and I can't seem to get any of the local contractors to call us back - it seems as though they want nothing to do with it. Help?? Thanks. Barb, Owatonna, MN
Hi Barb, It sounds like you have 24 inches between centers and maybe someone used 1/2" sheetrock instead of 5/8's.
If the rafters are 16" apart 1/2" rock would be fine but if they are 24" apart and you use 1/2" rock you get the roller coaster look. What I would do is get up there and try to push on one of the low spots with your hands. If it feels like it has a little give I would suggest putting a new layer of 5/8's over the whole deal. By the time you put up the new rock, use a lot of long screws, you will suck up both layers and get it flat again. If the popcorn texture is not real thick it shouldn't be a issue.
If when you push on the ceiling it feels real solid like it won't budge, then you might have to rip the whole sucker down and start from scratch. Here is one more idea, Put new boards over the top of every stud (over the top of the old sheetrock), like 1/2" or 3/4" or what ever it takes depending on how bad the humps are. I made a little diagram, see what I mean?

This way when you put the new 5/8's up, the humps won't be a problem. You will lose a little ceiling height but it sure would be easier then ripping down the whole ceiling. Hope I helped...Mike
Subject: Paper Tape Or Mesh Tape
Mike, Your website is awesome!! For a rookie homeowner and do it yourselfer it has helped alot. I was wondering what type of tape is better; the traditional tape or the mesh tape. I am in the process of adding a room to my house and not sure exactly what tape to use. What are the do's and don'ts of using each type of tape?
Thanks Marvid Charlson
If you use paper tape make sure not to get air bubbles under the tape. It shows all about that here How to hand tape drywall If you use mesh tape you should use a "hotmud" to coat with. It explains about Hotmud hereAll about Drywall Mud, Joint Compound (different types, how to mix, store, ect..)
Here is the problem with mesh tape. There is no way to get square corners. Mesh tape rounds, paper tape folds. When I do a smaller job I might use paper on the angles, mesh the flats and coat with hutmud. That way it's taped and 1st coated in one day saving me a trip. Mesh with regular mud will crack out. So if you use mesh, use hotmud. Hotmud is tricky, especially for a rookie, you have to mix it just right, you have to move real fast and hotmud is very hard to sand.. I would just use regular mud and paper tape if I were you......Mike
Thanks for visiting my site.
Subject: Air Bubbles Under Tape, How To Do Arch Bead
Hi Mike, I just have two quick questions about drywall I was wondering if you could help me with. We have been mudding our house and noticed that little sections of the tape seem to not be adhering. It seems like we used enough mud but when it dries these edges aren't sealed. Can we just put another coat on top or do we have to tear down and put up new tape?
Also, when affixing plastic arch corner bead have often do you nail it and do you use nails or is there something better? I know you are probably busy but if you get a chance I would love to hear your advice!
Thanks, Keri Lords
Okay Keri. If you could peel the edge of the tape up and get some mud underneath with the corner of your knife, then rewipe it, sometimes you can cheat like that. You probably should just peel off the blistered tape and start over.
When I was a rookie the old guys had a saying. "You have to insist that the mud comes out each side"
At the time, I thought it was stupid sounding. Insist seems like a big word for muddin'. Now it makes sense. Here is what it means. You put the mud on right
After you apply the tape and you start wiping, you must "insist"that the mud oozes out each side of the tape. If there is a spot that didn't ooze. That's a future air bubble and future problem for you. By pressing a little harder (with your knife) you should be able to get the mud to ooze out the sides. Now you won't have any air bubbles and no problems..

There is a how to hand tape section on my website that covers all this --->http://www.drywallschool.com/handtape.htm
Okay the plastic arch bead: This is how I do it. Make sure you have a big enough piece to do the arch. Start at the top, center of the arch. So you're holding the center of the arch bead in your hand.Staple the bead every couple inches on both sides as you come down. Just work your way down both sides. Take your time here. Kind of push a little in the center of the bead so it opens up just slightly. You don't have to staple every one of the tabs. Just every 3 or 4. You only need the arch bead where there's an arch. (Duh) When you get down to where it's a straight corner you can but up to a regular square corner bead. I'm only saying this because some people would try to go all the way to the floor with the arch bead and that would be very difficult to make look straight and probably end up looking like crap.
Jeez I'm writing a book here.
Okay, I know what you're saying. Staples?? That won't hold. It will if you apply your 1st coat with hot mud.
To learn about hotmud, go here --> All about Drywall Mud, Joint Compound (different types, how to mix, store, ect..)
20 min, 45 min, 90 min. It doesn't matter. Just make sure to use hotmud on the 1st coat. It will cement the arch bead on really good.
If a few staples or tabs seem to be showing through, don't worry. After it's dry you can pop a few nails into the tabs, Pull out any problem staples. Now you can second coat with regular joint compound.
Hope I helped...Mike
Subject: Floater ?? Air Bubbles
Mike, I have read your questions and answers about floating sheetrock... but still need help,
We are remodeling the whole inside of a house, and I became the floater.... FIRST time.. and need a little help,
I keep getting a lot of the air bubbles, and I have done everything, I use a 6 inch scraper, I apply a lot of mud, and as I'm hanging the tape, I start at the top with my scraper, and run it down as I apply the tape, BIG problem now.... some of the air bubble are still remaining under the dried mud, how do I get them out, they are very noticeable.... Please help me.... Thanks Rhonda
Floater?? LOL Never heard of that one. Try just placing the tape on the mudded area. Then wipe it from the middle, working your way out to each end. Don't try to tape and wipe all in one shot. Make sure you have plenty of mud under the tape. Thin the mud down enough to where it's easier to work with.
If there are a bunch of bubbles, I would rip the tape off and start over. If there are a few air bubbles you could take a utility knife and cut them out, retape just the bad spots.
Did you look here http://www.drywallschool.com/handtape.htm Good Luck...Mike
Subject: Drywall Thickness, Vapor Barrier
Mike, I have just discovered your web site. Nice! Thanks
A few questions ?
1. What thickness of drywall is recommended for a ceiling?
It depends on how far apart the studs are. If they are 16 inches a part you can use 1/2 inch sheet rock. If the studs are 24 inches apart you should use 5/8's inch sheet rock.
I am finishing a room above a garage and the ceiling has an angle. How do I match thicker drywall on the ceiling with the thinner stuff on the walls?
You lost me on that one. Where the wall meets the ceiling is going to be a taped angle. It shouldn't matter if the ceiling is thicker then the walls. Where the two meet, you would just tape, coat, finish like any other angle.
2. Is there any special vapor barrier considerations I should take because the room is above an unheated garage?
You should ask a insulation man but I would think you would want to put a vapor barrier between the garage and the new room.
Thanks. Wanda, Elk Rapids, MI
Glad to help..Mike
Subject: What Is "Tape And Bed"
Mike, I'm a little confused about the whole drywall finishing process. I need help ??.
A local drywall contractor told me he would tape and bed my kitchen and I'm not sure what he is talking about. I acted like I understood but I really did not. Is coating the same thing as bedding?? Dan..
In Wisconsin we would say "tape and coat". I think people from the South call it "tape and bed". Same thing...Mike
Subject: "Flat Tape" Gaps
Hi Mike, thanks for the web site, first of all --- invaluable stuff!
I've just finished hanging a room and have a couple gaps at the wall ceiling junctions as big as 3/8". Will I be able to mask this defect when I tape or do I need to re-hang those pieces? Also, should I be using metal reinforced tape ( cornerbead) for these angle joints, or simply go with regular tape? thanks much for your help, Michael..
Try to pre-fill the gaps with some quickset mud. "Pre-fill" is just going around with a think pan full of mud (Or hot mud) and filling in gaps and bad spots before you start taping. To learn more about drywall mud click here --> EVERYTHING ABOUT DRYWALL JOINT COMPOUND (MUD) If the gaps are not that bad I would just "flat tape" them. A flat tape is regular paper tape put into one side of an angle, flat. It helps to repair where there is a noticeable gap. After you put on the flat tape, you can go ahead and put your angle tape right over the top. You could also pre-fill and flat tape. You don't need metal tape for inside angles, corner bead is only used for the outside corners. Good Luck, let me know how it works out....Mike

Subject: More on "Flat Tape"
Hi Mike, Quick questions. I've got some of those gaps at the wall ceiling junctions probably as big as 3/8" just like your pro tips page talks about. You indicated that if the gaps are not that bad you would just"flat tape" them. Q: What is "flat tape"? Is this a specific kind of tape?
Q: What is "angle tape"? The only tape I can find is joint tape. Is this the same thing? I am a drywall newbie and I have a small number of errors that I need to correct. Any help would be appreciated.
Thanks, Dean Urbano... Louisville, KY
I will try to explain that a little more clearly. "Flat tape" and "angle tape" are just ways of taping, not different types of tape. It's all regular paper joint tape, just different ways of putting it on....Mike
Subject: Perlite Texture
Hi Mike, I am wondering if you can give me some information. I would appreciate it if you can. I have textured ceilings in the new house that I bought. I am now painting the rooms and need to re-apply the texture to some portions of the ceilings. Your site is the only place that I have seen a picture of this texture. No one else knows anything about it--not Home Depot or Lowe's or whoever... My texture looks like what you called the Perlite ceiling. Can you tell me where I can find this product (I live in Long Island) and how to apply it. Home Depot and such places don't carry and have never heard of it. Who would sell this stuff and how do I put it on? Thanks in advance. Robert...
I know Menards has a perlite type paint, also Sherwin-Williams. All it really is (perlite) is a primer with sand mixed in. Try asking for a sand primer?? I have a regular spray rig that I use to spray whole houses. On a small project like you're doing, I would just use a paint roller. If you go to my HOW TO PATCH, REPAIR A SMALL HOLE IN DAMAGED SHEETROCK page it shows how to roll on perlite...Thanks for the E-mail...Mike
Subject: Air bubbles under tape
Hi Mike, I've read your tips and just want to check if I'm about to do the right thing, or something stupid. In my bathroom down a join between two walls the corner tape appears to have buckled, my term, and one side is raised in a little triangle off the wall. I have a similar problem with ripples in the tape in another room - some approach ? thanks in advance for your time. Mike Sweetman,Bristol England...
I think you are talking about a inside angle right??
You need to get mud under that tape. I would use a utility knife, cut the bad area out and re tape and coat it?
There could be some movement under there (I'm almost sure of it). After you remove the bad section of tape, see if you can push in and move any of the sheet rock. If it seems like it's loose you could pop a few nails in there before you tape it. You might want to look at the "How To Handtape" section in my "Pro Drywall Tips" page....Thanks for the e-mail....Mike
Subject: Hopper gun gets heavy, texture ceiling
Hi Mike. Great site. I have a goldblat spray hopper and am attempting to do a knockdown texture on a ceiling. I've fiddled with the air pressure and mud viscosity the nozzle size and the exit opening. I am having trouble getting a coarse enough spray. I can get an acceptable result on a wall. When I get the pressure reduced enough to be coarse it doesn't have enough power to shoot it up to the ceiling. Any ideas? Steve
I've been there, just remember "Thin To Win".
Thin the mud down a little. You should still be able to use the air nozzle to get some pretty big size goobers up there. Another thing that might help is, when you 1st fill the hopper up, it's heavy right, so you will find yourself wanting to do more walls because it's easier on your arms. The ceiling would be easier with more mud in the hopper, do the ceiling 1st, I know it hurts.
Also it helps to kind of shake the hopper real crazy like, it gets that last little bit of mud down into the air.
Good Luck...Mike
Click Here -->
How To Do A Knockdown(Skip Trowel) & Orange Peel Texture
Subject: How to get rid of thick ugly texture
Hi Mike, Hope you can help me like you have been able to help all the others on your web site. We are renovating a 1926 "Mediterranean Revival" in Miami. It has really "bumpy plaster" in the living and dining rooms. In good repair. But just really ugly. The living and dining rooms - which are connected by an arch - have different patterns of bumps. I would like to even out the texture in both rooms - and hopefully have the same "look" in both rooms if at all possible. Think really chunky cottage cheese. The bumps protrude at least 1/8 to 1/4 inch. Can I just take plaster compound (or joint compound) and even it out? I would, of course, thoroughly disinfect the walls before I begin.
Any other ideas? My husband thinks I'm nuts. But I can't live with it the way it is. Thanks. Sally ...
Hi Sally, Usually you can always go with a different texture but the only problem is that you can only get thicker. Getting your bumpy ugly stuff down to an almost smooth surface again would be tough. You can try to skim the walls 2 or 3 times but if the bumps are that big, it's going to use a lot of mud, it's going to need a lot of sanding and your husband is going to lose it. I would either shoot it with something thick (acoustic, cottage cheese, http://www.drywallschool.com/textures.htm or put a new layer of 3/8's sheet rock over the whole deal. I Hope I helped a little, Good Luck....Mike
Subject: Perlite patch & sanding drywall sucks!
Mike, I enjoyed your site and helpful hints. Thanks, I'm glad I could help.
Two questions: Rather than using a roller with perlite to patch a lightly textured wall, have you tried using an airbrush or a spray can with light sand texture? For a Perlite patch, that's all I personally use is the roller. I have heard that a small pressure pot system works great for patches but have never tried one myself. If I'm doing a small patch that has an orange peel or knockdown texture, I would use the little spray can touch up stuff like your talking about..
What techniques have you used to cut down on the amount of dust from sanding? I bought a product from Home Depot that you attach to
your shop vac. It's essentially a pail of water with two outlets: 1) a hose to the vac input and 2) a plastic hose with a pad for a mesh
sanding square. We trying it but the vacuum was so strong than it sucked part of the water into the vac and the sanding pad had too much
drag, because of the strong suction. What products or techniques would you recommend.
Thanks Bill.... Weekend home improver...short of talent but I'm persistent!
Sanding Dust.. Lots of people hear the word "drywall" and they visualize there home covered in 2 inches of white powder. Any pro will tell you that they hate sanding. I hate sanding so I do as little as possible. Once you learn how to coat properly there shouldn't be much sanding at all. Thin your mud down so it's easier to work with. Really try to smooth things out. Lots of people gob the mud on thinking, "I will be able to somehow sand it down to make it look good". Try to make it look good while you're coating. The next day all you'll have to do is just dust over it with the sander.
Take the 5 gallon water bong back and just practice your mudding skills.
Good Luck...Mike
Subject: Hanging & Taping questions
Mike, YOU ARE THE KING! :o)
Let me start off by saying how much I appreciate your tips and info. NOTHING is more valuable than a true tradesman giving advice that only years of experience could produce. They are nuggets of pure gold, my man. Plain and simple, you are a skilled artist.
Now I have some questions for you to answer in your professional opinion: (these are all meant to be in most cases or in general)
Better to have more seams but factory beveled edge ones OR fewer seams but regular non-beveled butt joints?
When you're hanging the fewer butt joints the better. If you're hanging a basement and you're using 8' sheetrock, you would stand them up to avoid all the butt joints
Better to use screws on walls OR nails?
I usually nail enough to hold the sheet up and screw the rest.
Better to leave a small gap between joints (1/16") OR butt them as tight as possible?
Always Tight
Better to use fiberglass mesh tape OR paper tape?
I use paper tape, Some guys use mesh. If you do use mesh, make sure to use a quick set type hot mud. Mesh with ordinary joint compound can crack. Paper won't.
Better to fill a gap over 1/4" (for example at a wall/ceiling joint) with mud, let it dry, then tape it OR mud and tape all in one shot?
Yes, always prefill big gaps. If you have the time you can prefill with regular mud, tape the next day. Try mixing up some quickset 20 (hot mud), then you can prefill and tape right away.
And last but not least, what is the best way to remove metal cornerbead after it has been nailed in place (after discovering on a 45 degree angle seam that I had bent it and it looks a little wavy) Would multiple coats on mud ever be able to correct the waviness or should I try to replace it? What is your suggestion on cornerbeading a 45 angle (vertical and or ceiling)?
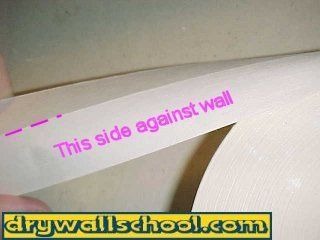
I would tear it off and start over. There is a flexible paper tape that works great for inside and outside corner angles......http://www.straitflex.com/sfmedium.htm
Thanks in advance, AV, Akron, OH ..
No problem...Mike
Subject: Ugly Joints
Hello, We recently moved into a new home that some "professional" converted an attic into a bedroom and also remodeled a bathroom. Unfortunately though, there are a lot of areas where the outline of the drywall tape can be seen. There are also a lot of uneven, bumpy surfaces. What is the best way to handle repairing these problem areas? Any advice would be greatly appreciated! Thanks! Julia ..
Hi Julia, It's hard for me to know exactly what it looks like or what it needs. It sounds like maybe everything was taped and not coated or maybe only 1st coated. You could go through with some thin mud and skim the outside edges of all the angles. Just wipe it on and back off again. You don't have to get right into the corner, just skim along the outside where you see the edge of the tape.
As far as the joints go, it probably would not hurt to go around and put another coat on with a wide knife (12").
If the whole thing is kind of a mess and you can see all the joints ect..You could putty coat all of it. All you have to do is mix a bucket of mud real thin. Using a paint roller, roll out a big section of mud on the wall or ceiling. Not too big, maybe 4' by 4'. Now using a wide drywall knife (12") wipe it right back off again. Work your way around until you have putty coated the whole deal. This will fill in all your low spots and get things more even.
If it's really REALLY rough , I would go with some sort of a thick concealing texture. A heavy knockdown, slapbrush or cottage cheese can hide lots.
You could always call up a pro drywaller in your area. Tell him that you have a project that is in need of a professional 2nd coat. I'm sure that it would not cost much for somebody to stop by and throw a coat on for you. Good Luck....Mike
Subject: Bending drywall for round arches
Mike - I need to make a couple of arches at the top of some soon-to-be built in bookcases. One is about 24" wide, and the other is about 30". What is the best way to build an arch? The walls around both bookcases will be drywalled, but I haven't started any of that yet. Not sure how to bend the drywall, etc. Can you help? Thanks! Tony C. ..
Tony, I'm not really a framer but I know that carpenters use plywood to actually make the arch. When it's time to drywall, use 3/8"sheetrock. Wet it down with a sponge or rag (Both sides). Let it sit for a few minutes and soak up some of the water. Now it should bend enough to work. After it's hung use plastic arch corner bead. They sell it at Menards or Home Depot. You can try to nail it on but, it's hard. I use a staple gun. If you do use a staple gun then you should use a quickset hotmud to coat the bead. The hot mud will help to hold the bead in place. If you nail the bead on , you could use regular joint compound. I hope I helped you out a little bit, Good Luck...Mike
Subject: Popped Nails
Hi Mike, I have a fifty year old house with an atrocious drywall job throughout. In addition, an underlying moisture problem has popped many of the nails. I believe that repairing it will be an arduous task, but I'm willing to do it. Here are my questions. Should the entire area be resurfaced? If yes, how? Is this something a do-it-yourselfer with little drywall experience can handle? Finally, how do you know when it's better to call it a day and rip out the old and replace it? Thanks, Mary
Hi Mary, If the old drywall is still in good shape you could try just going through and rescrewing everything. Lots of times in the old days they would double nail everything instead of screw. Over the years the nails tend to slowly loosen up. When it comes time to fix the popped nails, just pound them back in a little. Chip out any of the loose plaster and paint around the nail. Then drive a screw right along the edge of the nail so the head of the screw overlaps the head of the nail. This way it won't pop out again in the future. Another way you could do it: You could go over everything with a new layer of 3/8's or even 1/4 " sheetrock? Lot's of times you can butt up to the old trim and base boards without having to remove them. It seems like allot of work but really it's allot easier then gutting the whole house??
If I can help somehow, let me know...Mike
Subject: Pock Marks
Mike, Due to a fault in the drywall compound when my house was built, I have had to replace most of the joints over the past 10 years. I got pretty good at it BUT, especially lately I am having trouble with AIR BUBBLES. What am I doing wrong? I really need help!
Thanks, Harold...
Harold, I'm not sure if you mean air bubbles under the tape, or if you mean air bubbles on the outside of the joint? If you're getting air bubbles under the tape it means that you're not getting enough mud in the joint before applying your tape. When I hand tape, I use a 6 inch knife and I apply a generous bed of mud on the joint (As wide as the knife). Don't be stingy with the mud and your air bubble problems will be over. If you're talking about bubbles on the outside of your joint, this is known as "pock marks" this can happen for many reasons, such as: If you're coating some existing drywall in a house that has smokers, you might get pock marks. Applying regular joint compound over the top of a quick set joint compound might cause pock marks. If you're coating some existing drywall in a kitchen area, a slight grease film on the walls will cause pock marks. Sometimes you will get pock marks for no reason at all... A few squirts of dish soap mixed into your mud will help to get rid of the pock marks, it also seems to make the mud smoother.. There is a product out there just for this problem called "No Pock" Nopock.Com
Subject: More About Pock Marks
Mike - I appreciate the opportunity to ask a pro what the hell I am doing wrong. I have been doing remodeling as a side job for a couple years. I always get pock marks when I am coating, unless of course I am squishing out the mud so much that there is no way a bubble can remain. I have some good tools now, including a banjo and mud paddle, even stilts. I always have used USG Plus 3 all purpose for everything, and I mix it in the pail to get it creamy, usually add about 2-4 cups of water per 5 gal pail. I have not tried soap yet to get rid of the pocks, and I saw your recommendation to do this. Could you be more specific - like 1/8 cup of Dawn per 5 gal pail? I spend so much time going over these damn things even paying for No Pock would be worth it to me, if it worked.
I wish I had a set mixture but I really don't. Just a few squirts, like about as much dish soap you would use to do a sink full of dishes.
One other thing - when I have tried to cover the pocks, as a final coat after sanding, I have worked the mud real hard to get it into the holes, even after making it real thin with extra water. Then when I sanded again I found that the stuff I worked over is really freaking hard, like setting mud. So the area I worked doesn't sand, but does around the edges. This has caused me to leave the pocks until after priming and filling them then and just wet sanding with a towel. Makes me nuts, but it works. I am really fussy about drywall finishing and don't want to hear any complaints about defects. Thanks for any help you can provide.
I really have not did the dish soap or "no pock" trick myself in a couple years. The only real problem I have with pock marks is when I am doing some existing stuff (kitchens and smokers). New construction I really don't have a problem. I'll tell you something. Say you 1st coat your job, or lets say you 1st coated some corner bead. A few pock marks right ??, no bigie. Now on your 2nd coat you see you're leaving some pock marks again. You don't want to have to come back on the last day and skim coat all the bead because of some pock marks right?
Try wiping it just a little tighter on the 2nd coat. Push a little harder. Use thinner mud then you think you should be using. The 1st coat did the majority of the fill in work. You really don't need to lay the 2nd coat on so thick. Anyhow, I didn’t mean to write a book here. Just try a tad bit thinner mud on the 2nd coat and pull everything a little tighter. Let me know if it helps...Mike
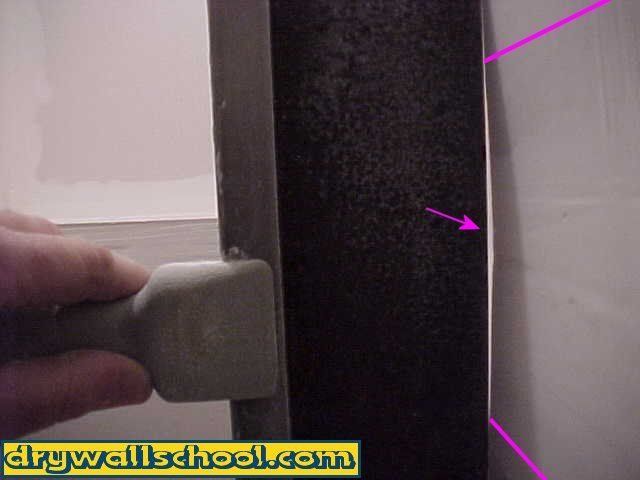
Subject: Metal Cornerbead
What is the best way to anchor metal cornerbead? Do you tape the edges of metal cornerbead? Also, I am finding that my inside corners are going a little slow...any tips for faster speed?
Thanks! Russ ...
Hi Russ, If you are using metal corner bead then regular drywall nails work the best. We use cuphead nails but ring shank will work too. If you use screws, you kind of loose control on the straightness of your bead. You do not need to put any tape on the bead..I'll tell you a trick, most people don't know how to nail and their bead ends up going crooked or they get shiners. That's where the bead kind of wrinkles because you are bending it out of square. When you start coating, these little high spots show through, that's why they are called shiners. When you put on the bead, get it pretty much where you want it, push the middle in so the bead opens up a little. Use your foot to hold the bottom in place, push enough that the bead opens up just a little. Put your 1st 2 nails in the middle (one on each side). After you have the 2 nails in (the middle) then you can go ahead, let go with your foot. I always start from the 2 nails and work my way up always pushing in slightly (to open the bead up just a little), put in another couple nails. Once you get to the top, start in the middle again and work your way down to the bottom. You should have a nail about every 6 to 8 inches. I have switched to the paper faced bead but if you put enough nails in the metal bead, it will be fine. Okay, about the inside corners. Is the taping what's going slow or the coating? Hand taping corners is kind of a slow process. If you're getting plenty of mud under the tape, you should have no problems. I always mud 2 or 3 angles then I put the tape on and wipe them. It seems to go quicker then one at a time. Did you see on my site somewhere it shows how to hand tape angles? The harder you push when you're wiping, the more mud you force out, the more square your angles will be. When you're coating, do one side of the angle one day, the other side the next. It is impossible to do both in a day because when you coat one side you're messing up the other side. I really hoped I helped you out. I am a great drywaller but my grammar and spelling skills suck.
Good Luck.....Mike
More Pro Drywall Tips Coming Soon
You can also find some good drywall tips in the "ASK THE PRO" section
Drywallschool.com grants you permission to view this Site and to print individual pages from this Site for your own personal, noncommercial use, provided that you agree to and accept without modification the notices, terms and conditions set forth in this agreement. You may not modify, copy (except as set forth in the preceding sentence), distribute, transmit, display, perform, reproduce, publish, license, create derivative works from, transfer or sell any information, material, software, products or services from this Site.
New Paragraph